I’m Dreaming of a Not-White Kitchen
So I realized today that in starting this blog about 90% of the way into our kitchen remodel by showing you how we tiled our backsplash, I’m doing everyone who actually cares about wanting to learn how to remodel a kitchen an injustice by skipping over all of the wonderful trials and tribulations we experienced over the past…. wait for it… 20 or so months!
Now please don’t let that little factoid scare you from doing a major remodel in your own home. It is a well-known fact that the hubs and I are total procrastinators who worked on this project bit-by-bit after long work days and over the weekends. (Anyone from work who’s reading this knows I might have worked on it a wee tid bit at the office, but you’re most likely reading this in the office right now, so HA! For shame.)
Also, I count much of the painstaking preliminary planning process (how’s that for an alliteration?) as part of that 20 month period. We only had to go without an actual functioning kitchen for a few days or so. It’s all in the timing.
So let’s take a little look-see at what we started with. If you have an aversion to the “color” white, you might want to skip over the next couple pictures:

Here you see the previous owners have chosen a bold color pallet of white and brass. While I applaud their effort to think outside the box, we knew we wanted to warm things up a bit with the remodel. The door on the right side of the picture goes out to our garage, and the stool is from Wal-Mart (because I know you want one) and is WAY too tall for the counter-height bar.

The door on the right-side of the above image is the almost-walk-in pantry (which I’ll admit I was hesitant to demolish), and just out of the picture to the right is the entrance into the living room. I was standing in our only dining area while taking this photo.
Now let’s take a closer look at the layout:

One of the first things you should do when planning a DIY remodel like this is pull out some graph paper (or a fancy, shmancy computer program) and draw out your existing layout. It’s important to visualize all of the issues that have been causing your problems so you can visualize how to fix them.
You can see that aside from the poor quality of our cabinets, we had many problems with “dead” or unused spaces in the existing layout. There were two locations (the corner of the peninsula and the “dead end” next to the fridge) where I had to literally crawl inside the cabinets to reach anything. The design simply wasn’t taking full advantage of the space. Immediately I knew that would be the first fix.
We also knew we didn’t want to change the location of the sink or dishwasher (to avoid major plumbing issues), but we were willing to move the fridge and stove if need-be. I’ll skip over the drawn-out process of how we finalized our layout, but let me say a few things:
- The Kitchen Forum on GardenWeb was a life-saver when it came to getting the opinions of other TKO-ed (Totally Kitchen Obsessed) people like me.
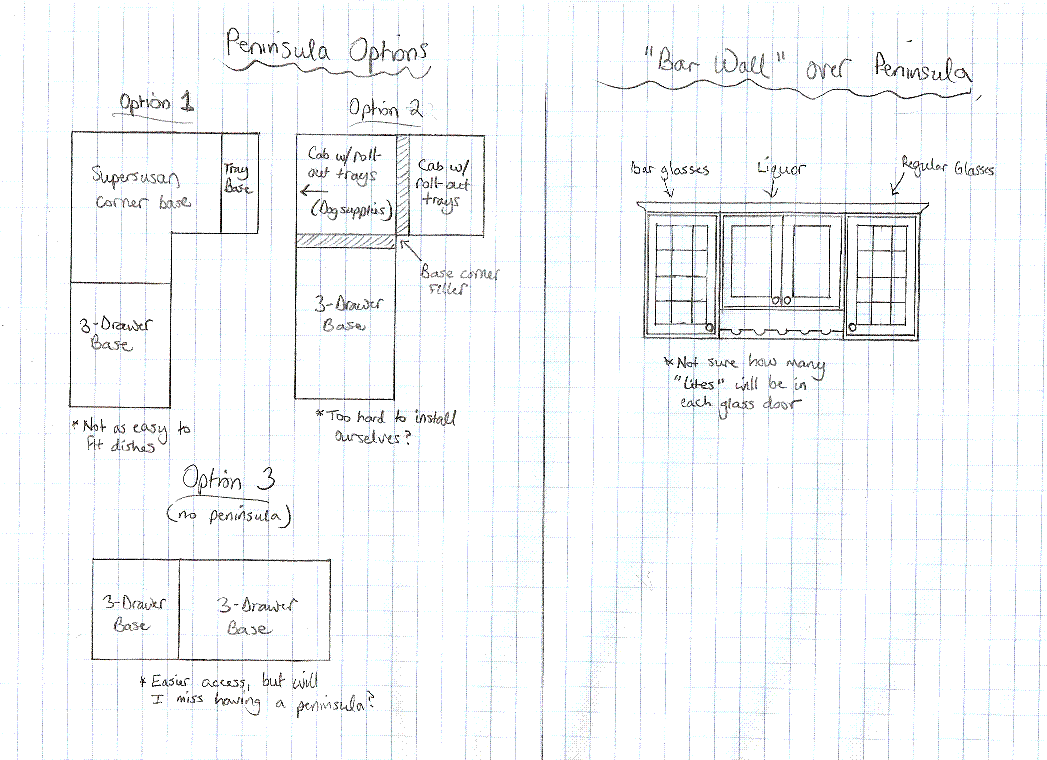
- Draw out multiple design options and research, research research the unique storage choices that are available. We ended up cutting many of the ones I wanted due to budget constraints, but while you’re drawing your preliminary designs, the sky’s the limit!

- LABEL your drawings with the locations of all of your major kitchen items (dinnerware, utensils, storage and serving containers, small appliances, pots and pans, knives and cutting boards, food, etc.) so you know you will have a place for everything when the cabinet order is in and you’ve cut that check for a substantial amount of your life’s savings.
- Pay attention to the direction your doors might open and where you might need spacers. Take a look at Peninsula Option #2 above. The 3-drawer cabinet needed to be spaced away from the inside corner so that I could open the drawers without hitting any knobs or pulls sticking out from the cabinet with the roll-out trays.
- When in doubt, use masking tape! I had masking tape laid out all over my floor in various configurations to make sure I would have space to walk through certain areas. For example, I was concerned about having our large, non-counter-depth, french-door fridge directly across from the peninsula. But I put down a little masking tape where both the fridge and peninsula would end, and discovered I would have plenty of room! Of course, you may not be able to do this if you have existing cabinetry in the way and are afraid to demo too soon.
- After contemplating buying stock cabinets from places like Lowe’s or Home Depot, builder-grade cabinets from a local kitchen design place, or going completely custom with a local cabinet builder, we ultimately decided on the custom guy. Surprisingly enough, he was able to give us the best options for the best price. Sure, we spent a bit more than we would have on stock cabinets, but what we ended up with are SO MUCH BETTER and completely custom!
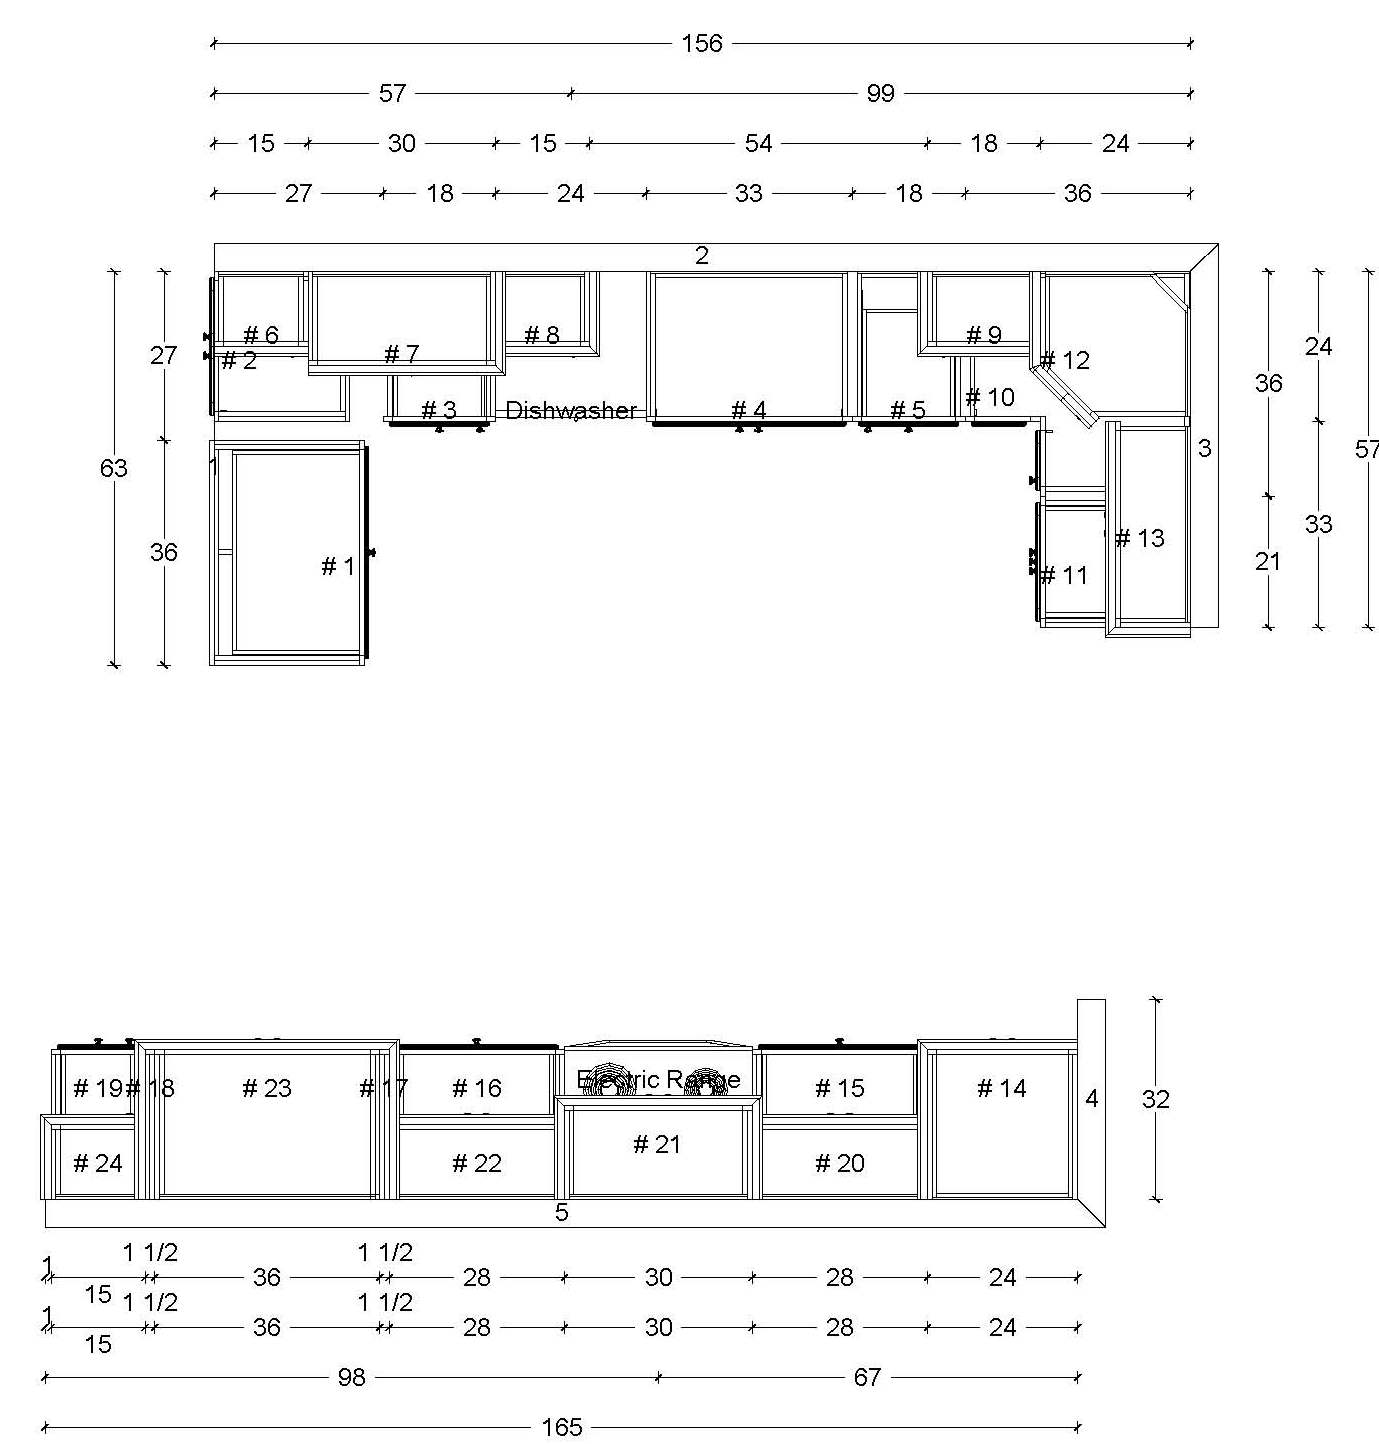
Travis Alfrey, our extremely talented ex-bank-CEO-turned-cabinet-maker, was by far my favorite tradesman to work with. Working off several of my designs and budget, here is what he came up with for us:

(The 2 walls on the right should be aligned.)
Aside from all of the “basic cabinet” stuff, we’d be getting furniture-style toe kicks, crown molding, staggered wall cabinets, soft-close drawers and doors, all lovingly crafted with alder wood with a beautiful cherry-like stain.
“Sold!”
When the cabinets arrived, I wanted to marry them and have their babies. No joke.
But first we had to demolish the existing kitchen. (Of course, there were many, many other decisions that had to be made prior to tearing out our only source of sustenance, but I will tell you about those soon enough.)
Here’s a sneak preview:

So there you have the first part of this little kitchen remodel adventure. There’s still a lot to explain – riveting things like how we picked our counter top material, why D-day (Demolition Day) is NOT as fun as you would think, what to do with those old kitchen cabinets once you tear ’em out, and why did we visit my grandma for Easter so she could feed us candy and chocolate bars non-stop before we go to Hawaii next month??!
But that’s all for another day.
Oh, and one of my bestest friends is currently starting her own kitchen remodel. She lives in a beautiful old home on a small lake, but her kitchen has got to go. Stay tuned for some of her stories as well, including the installation of a gorgeous new picture window through which she can truly enjoy her lake views, stunning new cabinets and butler’s pantry (sounds fancy, eh?), and photos from her upcoming D-Day Party!
It’s time I show you what a real mess looks like.

Comments
Hey, just stopped on over from YHL! Can’t wait to see the big reveal! Can’t believe you’ve been working on the kitch for 1.5 years! WOW!
Good luck!
Lindsay from Tell’er All About It!
Hi, thanks for stopping by! The 1.5 years is my best guestimate from when we first started the agonizing decison-making process. For anyone less decisively-challenged than me, it could potentially go much quicker. :)
In your kitchen, sink is one of the most important parts of your kitchen appearance and performance. If you can combine useful and beautiful sink, you have a great kitchen for cooking.
I have heard of your cabinet maker….what price point is it? I have a L kitchen and have recieved a price from Cabico for 17k…..is custom really any cheaper?
I don’t remember for sure (this was 4-ish years ago), but I believe the cabinets cost around 12-13K. For us and what we actually received, it was definitely cheaper AND better quality. We could’ve gotten builder-grade cabinets for less, but they wouldn’t have looked — or have been — nearly as nice.
[…] View Image More Like This […]
[…] More @ http://www.domestiphobia.net […]